Free Subscription...

Now you can sign up on the right -------------------->
for a FREE subscription to my blog!!! Yes I know how generous of me to give everyone a FREE year subscription! 
*wink wink*


Week 20: Chalkboard Tags

A few weeks back over at My Repurposed Life Gail had a guest blogger, MeganDVD from Beauty in the Attempt. She showed us how to make Chalkboard Tags and immediately my dresser problems were solved.


Now my dresser is fine. I have it organized just right and unfortunately my clothes sizes don't change that often so it makes it pretty easy to memorize my own drawers. *Insert laughter from my witty joke*
Not the case for my adorable, growing like weeds children. I get so confused how I have each drawer organized and it seems like I am adding new clothes and taking out clothes not only because of growing needs but with the seasons as well. And in Colorado it could be 40 degrees one day and 85 the next! I know you moms out there feel my pain.


I had been thinking about it for a while how I want to remind Andy myself what is in which drawer. I thought about using tape and although the dressers are not in the best shape and missing pulls (which I don't mind because one was a freebie and both dressers are in the closet). I was worried that tape might pull off some of the finished and I don't want to commit to painting them right now. The contents of the drawers are always changing so I would be adding and removing tape, a lot. That was really my only idea. Then came MeganDVD she solved my problem in one blog posting! I followed her directions pretty well except one thing....


When I was at Michaels I couldn't find chalkboard paint but I did find something which I think might be even better. Chalkboard contact paper! It gave this project instant gratification since I didn't have to wait for paint to dry and my completion time was about 8 1/2 minutes for 8 tags. I strung some cute masculine (I have two boys remember) through the hole and used a staple gun to staple the ribbon to the inside of each dresser drawer.


I love the wet erase chalk pen. It eliminates all most of my fears of Max wiping off each drawers contents. I just need to remember not to let him watch me erase each tag or my fears will be back with a vengeance.


Thank you MyRepurposed Life for introducing me to MeganDVD at Beauty in the Attempt she is a problem solver!
Posted by Picasa

Week 19: Dinner Calendar

"What are we having for dinner?" is a constant question in our household. In January, we decided to switch off nights (I am lucky enough to have a husband that enjoys cooking!) for dinner. Our system worked well then spring vacations happened and it was hard getting back into the swing of things. I saw some really cute dinner calendars online, which are adorable and cute. But, I wasn't sure if we were going to stick with the whole idea of writing our meals down each month. I wanted a simpler calendar to start on this new organizing adventure.


When I was at Target recently they had calendar wall decals on clearance. So I picked one up and I think that the purple goes quite well as an accent color. Remember: This is a trial. I also grabbed some poster board. (That was Step 1). Step 2: Unroll the decal and peel the paper backing off. Step 3: Smooth out any air bubbles with a Baby Symphony CD0, this is will only work with a Baby Symphony CD... just kidding. Step 4 (not pictured): Cut off excess poster board. That is it so simple. The decal even came with a dry eraser marker for my convince.  


I put our calendar on a picture frame easel that I had from something else, I am not even sure why I had it. I wrote on the top who was cooking each day and what we had going one that would keep up from eating at home. It is working fine but the best part is that it is a guide and I don't have to follow it to a T. Flexibility is the key in our house.


Posted by Picasa

Week 18: Front Porch Chairs

I am totally over "matchy matchy" and our front porch chairs were exactly that. The perfect beige to match the beige trim on our house. This winter I decided that I wanted to spray paint the chair to add some color. But then I was thinking that I should just make a slipcover for the chairs to add some BOLD color to our curb appeal.


I was all over the place at Joanns trying to pick a good outdoor fabric. I didn't want to regret my decision and pick a "safe" color scheme. I had some bright blues in my cart for a while but ultimately choose these two fabrics. I love the branches and the birds. The pillow in the contrasting color I love it. It seems to calm down the bright coral a bit. I did lay each of the fabrics over my two chairs and was leaning toward the circle fabric in the slipcover but in the end went with my original plan and as of right now I have no regrets. Until the HOA says something to us!!!


So here is the chair in all her glory. The best part is that I have them attached with ties so I can take them off and wash them as needed. There is a second chair and it is on the front porch as well but I am too embarrassed to show a full picture of the front of our house until I get some flowers planted. Look at our grass, thank goodness we got the sprinklers turned on last week! A full curb appeal picture will be coming soon!

Posted by Picasa

Garage Sale Season

We are in the thick of garage sale season and last weekend we made it out for our first shopping trip. We stopped for breakfast and coffee (Max and I needed our strength) and headed around the neighborhoods. What I love best is how much Max digs the garage sales and picks up my lingo. If I drive by one and don't stop Max will say, "That's not a good one." Which I do agree with seeing as how I just kept on driving. Last Saturday Max was on the hunt for anything Play-Doh, he remembered buying something Play-Doh last year at a blue house and was hoping to find more at the same house. Sorry buddy I have no idea what house you are talking about. So we looked high and low for Play-Doh and one house did have it but the young owner was not willing to part ways with his Play-Doh at this time and we didn't get the sale. But Max was happy with his bucket and sandbox shovel for a total of 20 cents! He is excited to look some more this weekend, if we can fit it in.


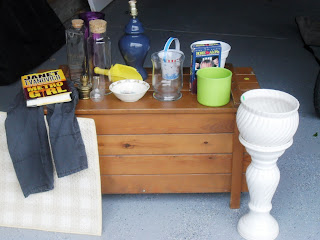
But everything here we got for $19.00!!! Stop cleaning your glasses that is not a typing mistake it was all $19.00 including 3T pants, Janet Evanovich book, white ceramic pot and stand, two circular planters, two glass jars with cork lid, Home Alone movie (on VHS), blue lamp, carpet sample, bunny bowl, bucket and shovel for sand box, purple vase, beaker, and the wooden toy chest. Not bad for our first sale out of the gate!

P.S. I do have an adorable picture of Max standing behind all of the treasures but, um, hm, he is not wearing pants so I will not be posting it on the World Wide Web. *Note* Make sure Max wears pants!

Week 17: Kitchen Chairs

I found some extremely retro 70s chairs at Goodwill (for $4.99 each) a while back when Andy had just finished making the new kitchen table. Now I have to admit that the chairs were pretty 'cool' in there own right but they just didn't go with our house. Bummer. I had been looking for oilcloth for the chairs for a long time, in the stores and online. Nothing really screamed out at me. So in a last ditch effort, because I wanted to use the chairs, I bought some white picnic table fabric from Hobby Lobby. I think a yard was under $4.00 and I thought 'whatever it works for now especially for the price.' I only bought a yard and didn't cover both chairs so I headed back to Hobby Lobby to buy an additional 1/2 yard of the white fabric to finish the chairs and found this black and white damask outdoor fabric. The tag said it was soap and water washable so I decided to give it a try instead of the white fabric that I didn't even care about.
And I gotta tell you am diggin' the last minute change!


The chair with the booster seat on it still has the white table cloth fabric because I thought it would work out a bit better and clean easier for me with the really messy, I throw food on the floor and wipe food every where including these nicely recovered chairs because I don't know the difference between your hard work to recover these chairs and the cool original retro look. When we are done with booster chairs I will finish that chair with the matching fabric.
I spray painted the legs black and first used Zinsser spray primer. It seems to be sticking I am guessing that I will eventually have to do some touch up but to me that is not a big deal. I took off the seat and just used a staple gun to attach the fabric. And for the seat back I sewed the fabric to essentially make a pillow case. It is not permanently attached so I can take it off when we are doing something extremely messy like eating spaghetti or finger painting. I do have to go back and check to see if the fabric is machine washable too or just soapy water washable.


Here are the chairs pushed in with the gray table which are a perfect height for each other and push in so close to the table it doesn't mess up the walkway we were aiming for when we Andy built the table.
Posted by Picasa