Week 6: Bed Frame Bench

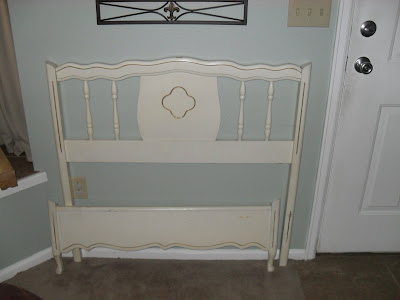
"I bought a bed," I told Andy back in October after a very successful day of thrifting. His face looked a bit confused as I started to explain why I bought a bed... for $15.00! I had a vision, thanks to My RePurposed Life, of a bed frame bench. I showed him a picture and he was on board. But then the bed frame sat in the garage, then it sat in the basement, then we had a baby, and finally in week 6 of 2011 we got to work.

Andy did the building part and that is why there are no pictures but to make up for it... here is an adorable 3 yr old excited for the new bench that will host several timeouts during the next few years! The basics are: there is a bottom board for storage underneath and the seat is three pieces of wood attached with these hinges.
After it was put together the painting began. We wanted to use an oil base paint and we decided on black instead of brown. We thought that we had use a glossy black on the hutch so that is what we went with for the bed bench. After we got it on then we realized that the hutch was not glossy but matte. So the bench is a bit shinny but I think it still looks good.

The day that Andy went skiing I also painted the cut outs on the bed frame the same color as the wall color. In the picture and in person it looks white. I am not sure if we are going to keep the outline or go over with black. I am still debating.


But this is where she will be right at the front door. Shoes can be stored underneath the bench and purses, diaper bags, and blankets can be in the storage section. It is really handy I love sitting on it while I wait for that cute little 3 year old to get his shoes or jacket on because, "I can do it."
Posted by Picasa

Week 5: Coat Rack Wall

Andy aka General Contractor forgot to take a picture of the wall before he started attaching our coat rack wall. Or I didn't snap a before picture fast enough before he started going to work. So here is a picture of the frame of our coat rack wall.

We used 1x4 for everything and ripped one 1x4 to make it into a 1x2, thanks to a friend with a table saw. Once Andy got the wood up with finishing nails and liquid nails then he filled nails holes with caulk. He painted 2 coats of paint and we realized that there was a piece of wood that was not flush with the wall. So when Andy went skiing I the kids, grandma, and I went to Home Depot for Kids Build Day (making up my own name for the first Saturday of the month party at Home Depot where they have popcorn, building projects for kids, and a giant battery walking around) and I got painters caulk. When we got home I filled in all the gaps and seams with the caulk, let it dry, and gave the wall and wood another coat of paint. Then I hung up our hooks, from Hobby Lobby, and called it a day.


I love it!!!! We just need something or somethings on the top ledge. I am thinking a picture frame for sure not sure what else to add. But I will keep my eye open for something that wants to be transformed from Goodwill.
Posted by Picasa

Valentines: Indoor Fabric Scrap Wreath

I don't even know who to give credit to for this idea. My sleep deprived mind didn't dream it up but someone in blog land did and it seemed easy enough so I decided to give it a go.

I took a look through my scrap bag and pulled out all the fabric that had shades of pink. I cut each piece, with shears, into a 6-7" rectangle. Once I had a good start I took a wire hanger and with wire cutters cut off the hook and twisted the ends together. Then I started tying each fabric on the hanger. Surprising myself I didn't do a pattern I just made sure that any of the bold pinks or the pink with green we not right next to each other. I think it turned out pretty cute and it was super easy! I am debating to do another one, green, for St. Patricks Day!

Posted by Picasa

January Hutch

This is not a project that counts towards my 52 but every month I plan on decorating this flea market find aka the hutch (which didn't look like this when we got it) in a specific color. Overall, I am happy with the blue for January but I need to be on the lookout for additional items when I am at the thrift stores. I made the coffee filter wreath at the beginning of the month from a tutorial at The Nester and added the blue ribbon with upholstery tacks. I plan on keeping that there all the time and changing the ribbon for the month.

The hutch I found at the Mile High Flea Market. The day I went there I was on the lookout for old cabinets that could become a build in under the window with a half table. I was not finding anything when I saw this old, ugly hutch. I think it was the topper of a buffet but the bottom was perfect and it could stand on its own. We, General Contractor, sanded it down and painted it black with oil based paint. I found scrapbook paper and matching knobs at Hobby Lobby. I used spray adhesive to attach the paper. I didn't use Mod Podge on top because I didn't want it shiny. So we have to be careful with what we put close to the paper but I am okay with that, it is a display piece to us. The second it came in I feel in love with the look. Not bad for a total of $50 (hutch and materials included!)
Posted by Picasa

Week 4: Organizing the Utensil Drawer

I don't think I need to give an explanation of why I thought that organizing this drawer would help out on a daily hourly basis. I do have to admit that I felt a bit like Rachel Ray sifting through the drawer looking for what I needed. I was always amazed, when I watched her show, at hour she was always looking for a spoon. So I decided to tackle the drawer.

Once I got everything out of the drawer I realized that the contact paper that the previous owners had put in had seen better days. I thought about what I had on had. Scrapbook paper, spray adhesive, and mod podge. Let's give it a try.
I laid out the scrapbook paper and cut it to fit the drawer. Then I sprayed the spray adhesive on the paper and the drawer (not pictured) then positioned in back in the drawer.
After all four pieces were in place then I moved on to the mod podge. I applied a really thin layer to the paper with a foam brush and let it dry.
I found this basket at Goodwill for $1.99 and it looked fine like this but since I did the drawer all nice and pretty with the paper I thought the basket should look good too!


So it got a good coat of Espresso spray paint by Rustoleum. Looking good and ready for the drawer!


AHHH! More organized and it feels so good! I am still on the look out for another shallow and longer basket for all my spoons, tongs, ice cream scoop, ect.

Disclaimer: I have no idea if the scrapbook paper with mod podge will hold up. But I figured it can't be worse than what it was before and if it is then I will go and get traditional contact paper.
Posted by Picasa

Valentines: Front Door Addition

I thought my pink beads addition was pretty cute for the wreath at my front door. But then I saw a tutorial for a Kissing Ball and I had to make a few.
They look a little like lollipops. And I am thinking that trimming the dowel rod down may lower the lollipop factor or getting some moss too. I am heading to Hobby Lobby and Michaels after dinner... moms only! And may pick up some moss while I am there.
There is one more part to my Valentines front door that I have to finish start but the weather needs to get a bit warmer to break out the spray paint. I checked the 10 day forecast and this weekend looks promising.
Posted by Picasa